Creating a Receipt by Amount
End users can create a receipt by amount for items that are not considered assets as defined by OAKS. Receipts can be created for purchase order (PO) line items or schedule lines. When creating an amount receipt, a partial receipt must be created for only the amount received since a dollar amount cannot be rejected on a receipt. Additional partial receipts can be created for the remaining amount received over a period of time. A receipt can only be created in OAKS if a PO was completed. If the item or service was purchased with a payment card (Pcard), a receipt cannot be created.
To create a receipt, begin by navigating to the Receiving page:

Step-by-step:
- On the Add a New Value tab verify the PO Receipt box is checked. This indicates the receipt is being created from a PO.
- Click the Add button.

Use the Select Purchase Order page to locate PO lines or schedules that need a receipt created.
In the ID field enter the desired PO number.
Verify the PO Remaining Qty radio button under Receipt Qty Options is selected. This ensures that if prior receipts have been created against this PO, only the balance of what remains to be received will show on the Maintain Receipts - Receiving page.
- Click the Search button.

- Select the checkbox under the Sel
column from the retrieved rows next to the line(s) that need a receipt
created.
- If a PO has multiple item lines or schedule lines, each line will appear and a receipt can be created for just one line or multiple lines.
- Click the OK button to open the Maintain Receipts - Receiving page for the PO line that was selected.
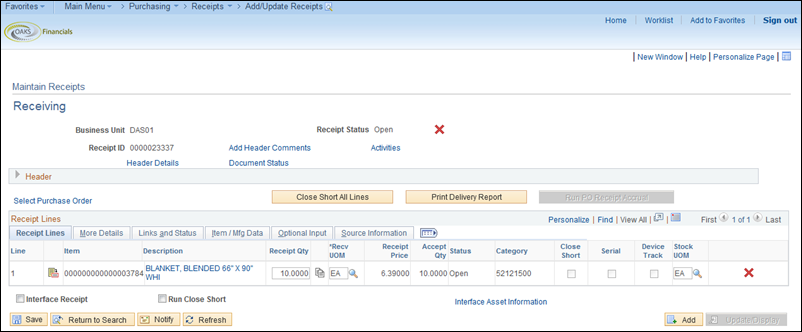
The Maintain Receipts: Receiving page displays the receipt details of the selected line and schedule.
Enter the total amount of goods or services that were received in the Price field. This may be the remaining total or a partial amount.
- This field will initially display the remaining amount left to receive from the PO line selected.
- If you did not choose the PO Remaining Qty radio button on the Select Purchase Order page, this field will show the full amount of the PO line rather than the remaining amount left to receive.
- Note that the Receipt Qty field will always reflect “1.0000” for a purchase order using “AMT” as the unit of measure.
- Click the Links and Status tab.
Click the Line Comments
 icon to go to the Receipt Line
Comments page.
icon to go to the Receipt Line
Comments page.You can also use the Add Header Comments link under the Receiving section toward the top of the page. A comment in the header will apply to all lines being received if you want to include a note that appears for all items or services.

Use the Receipt Line Comments page to upload attachments and add any additional notes related to a specific receipt line.
Add desired comments in the comments text box.
- Click the Shown at Voucher checkbox to ensure the line comment will appear when the receipt is referenced on a voucher.
- Click the OK button.
- The receipt will have a default Receipt Date of the date the receipt is entered. Use the Header Details link to update the Receipt Date if the actual date the items were received is known.
- Click the Headers Details link.

- Update the Receipt Date field to reflect the date the items were actually received.
- The Receipt Date cannot predate the date the PO was created.
- Click the OK button located at the bottom of the page to return to the Receiving page.
- Click the Save button to save this receipt.
- Use the Receipt ID number that has been assigned to search for and reference this receipt when necessary.
- To edit the receipt, return to the Receiving page and use the Find an Existing Value tab to retrieve the receipt.