Creating a Receipt by Quantity
This job aid outlines the basic process to create a receipt by quantity for items, including non- asset items as well as those considered assets as defined by OAKS. Receipts can be created for purchase order (PO) line items or schedule lines. A receipt can only be created in OAKS if a PO was created If the item or service was purchased with a payment card (Pcard), a receipt cannot be created.
Begin by navigating to the Add/Update Receipts page:

Step-by-step:
On the Add a New Value tab. Verify your business unit is populated and the PO Receipt box is checked. This indicates the receipt is being created from a PO.
Click the Add button.

Use the Select Purchase Order page to locate PO lines or schedules that need a receipt created.
In the ID field enter the desired PO number.
Verify the PO Remaining Qty radio button under Receipt Qty Options is selected. This ensures that if prior receipts have been created against this PO, only the balance of what remains to be received will show on the Maintain Receipts - Receiving page.
- Click the Search button.

- Select the checkbox next to the line(s) under the Sel column from the retrieved rows that need a receipt created.
- If a PO has multiple item lines or schedule lines, each line will appear and a receipt can be created for just one line or multiple lines.
- Click the OK button to open the Maintain Receipts - Receiving page for the PO line that was selected.
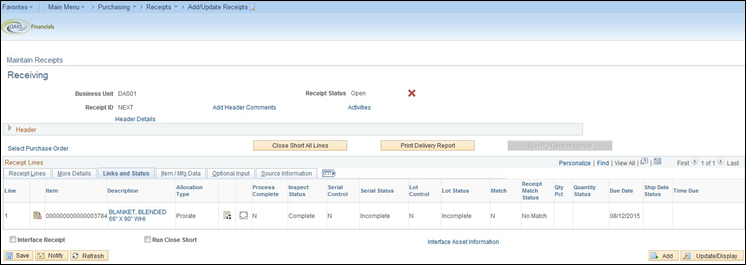
The Maintain Receipts - Receiving page displays the receipt details of the selected line and schedule.
Enter the total amount of goods or services that were received in the Price field. This may be the remaining total or a partial amount.
This field will initially display the remaining amount left to receive from the PO line selected.
If you did not choose the PO Remaining Qty radio button on the Select Purchase Order page, this field will show the full amount of the PO line rather than the remaining amount left to receive.
Click the Links and Status tab.
- Click the Line Comments
 icon
to go to the Receipt Line Comments
page.
icon
to go to the Receipt Line Comments
page.
- You can also use the Add Header Comments link under the Receiving section toward the top of the page. A comment in the header will apply to all lines being received if you want to include a note that appears for all items or services.

- Use the Receipt Line Comments page to upload attachments and add any additional notes related to a specific receipt line.
- Add desired comments in the comments text box.
- Click the Shown at Voucher checkbox to ensure the line comment will appear when the receipt is referenced on a voucher.
- Click the OK button.
The receipt will have a default Receipt Date of the date the receipt is entered. Use the Header Details link to update the Receipt Date if the actual date the items were received is known.
Click the Headers Details link.

- Update the Receipt Date
field to reflect the date the items were actually received.
- The Receipt Date cannot predate the date the PO was created.
- Click the OK button located at the bottom of the page to return to the Receiving page.
- Click the Save button to save this receipt.
- Use the Receipt ID number that has been assigned to search for and reference this receipt when necessary.
- To edit the receipt, return to the Receiving page and use the Find an Existing Value tab to retrieve the receipt.
- Make edits and save new information.
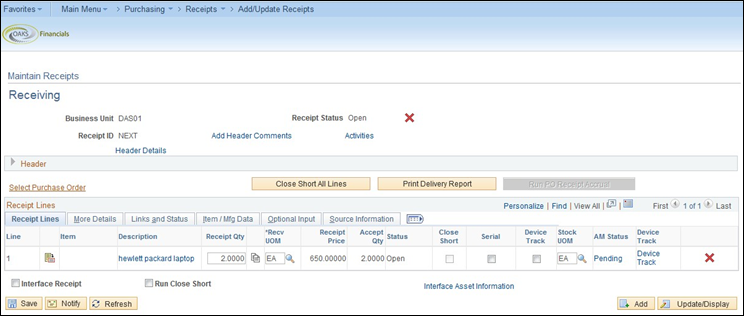
- If the AM Status column appears, enter the asset information for the line item. Use steps 17-33 for instructions on how to enter asset information.
- If this column does not appear, the purchase was not identified as an asset on the requisition or purchase order. If the item is an asset, the Requisitioner will need to modify the purchase order to identify the item as an asset before the receipt is created. Refer to the PO 200 workbook, section Modifying PO Distributions, for instructional steps.
- Click the Serial checkbox to enter Serial IDs and Tag Numbers for assets. Serial IDs and Tag Numbers are important for any line of a receipt that has a quantity (Receipt Qty) greater than one where you need to create individual assets for each of the items in that receipt line.
- If this box is not clicked, the Asset Processor will have the ability to divide the quantity into individual assets on the Asset Management tables and add Serial IDs and Tag Numbers.
- The AM Status field displays the status of the asset. To continue with these steps, the page must show an AM Status of “Pending.” If the AM Status is “Moved,” OAKS has already loaded the receipt to AM from AP and you can no longer make changes to the asset on the receipt.
- Click the Pending link to enter asset information for this line.

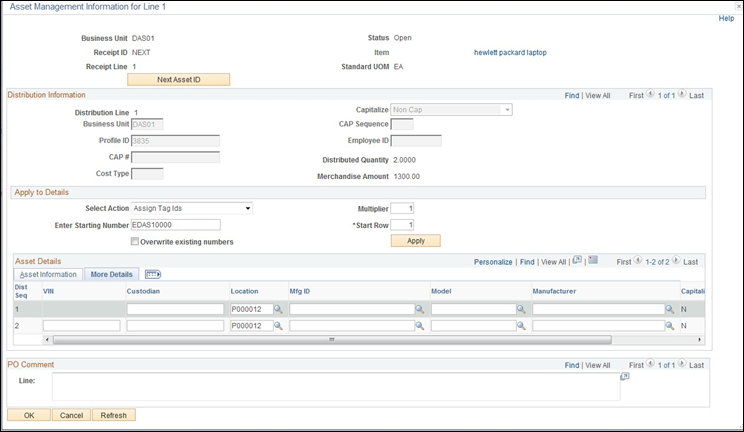
- Use the Asset Management Information for Line 1 page to enter additional information about the asset.
- You cannot edit the Profile ID on the receipt; you must change it on the purchase order.
- If an asset has split funding, you need to make sure all of the lines for the asset have one Asset ID. Each Asset ID represents a separate asset.
- If the asset has more than one funding line, OAKS will display a Use One Asset ID button next to the Next Asset ID button in the receipt header. You must click the Use One Asset ID button so that OAKS only creates one asset from the item with split funding.
The Asset Information tab displays information about the assets.
If the Serial checkbox was selected, OAKS will divide a single line containing multiple items on the receipt into separate lines. This allows individual Tag Numbers and Serial IDs for each item to be entered.
- OAKS automatically enters "NEXT" in the Asset
ID field. You usually do not need to change this field.
- Only change the Asset ID if the line item is not a new asset but is part of an asset that already exists in OAKS AM (e.g., a new computer monitor for an existing PC). Enter the existing asset’s Asset ID in this field to add the cost of this line item to the existing asset's cost.
Use the Apply to Details section to assign Serial IDs or Tag Numbers to both lines without entering information for each line individually. This can be especially helpful if you purchase a large number of items on one line item and those items have an unbroken series of Serial IDs or Tag Numbers.
Select either Assign Tag Ids or Assign Serial Ids from the dropdown menu to populate the corresponding Asset Information fields.
- Populate the Enter Starting Number field with the first Tag Number or Serial ID.
- Click the Apply button to assign the sequential Tag Numbers or Serial IDs.

- If the Serial ID field was not populated using steps 19-21, manually record this information in the Serial ID field.
- Click the More Details tab.
- Use the Custodian field to enter the name of the state employee responsible for the asset.
Make sure you find and select the correct Location for each asset. All asset locations begin with the letter “A.” An asset location is not a specific wing, floor, or room of a building.
Click the Location Look Up icon
 to
find and choose an asset location.
to
find and choose an asset location.OAKS displays all locations on the Look Up Location page, including PO locations. You need to enter search information to limit the list to asset locations.
- Enter the desired information into the Model field.
- Enter the desired information into the Manufacturer field.
- Click the OK button to save the information for this line of the receipt and return to the Maintain Receipts- Receiving page.
- Click the More Details tab.

Use the More Details page to enter information regarding items that need to be rejected during the receiving process.
Enter the number of items that are being rejected in the Reject Qty field.
Enter the action you want the vendor to take in the Reject Action field.
- The actions available to select:
- C – Return for Credit
- R –Return for Replacement
- Use the Reject Reason field to select the reason for rejecting the item.
- The reasons available to select:
- Damaged
- Early Shipment
- Failed Inspection
- Incomplete Shipment
- Late Shipment
- Restocking Fee
- Unauthorized Shipment
- Wrong Goods Received
- Use the RMA (Return Materials Authorization) Number field to enter the return materials authorization number supplied by the vendor and used as a reference number for returned items.