Adding a Customer
Customers are the entities to whom agencies provide goods or services. Receivables (open items) must be attached to a specific customer. Therefore, the first step to entering a receivable is verifying that the customer exists in OAKS FIN and, if not, performing these steps to enter the customer into the system.
OBM State Accounting has established agencies that provide goods or services to other state agencies as customers in OAKS FIN. Divisions or institutions within state agencies can be added to the customer record as additional address locations by the selling agency.
Each agency maintains its own customers. Changes made by one agency will not affect another agency’s customers.
When a new customer is entered into OAKS FIN, the Customer ID can either be automatically generated or manually entered according to an agency standard.
Each agency has its own policy for recording agency contact information for reference on the customer's record.
Before Creating a Customer
Recognize the need to invoice that customer, and verify that entity does not already exist in OAKS FIN for the agency.
If the customer exists stop here, otherwise continue to Steps for Creating the Customer.
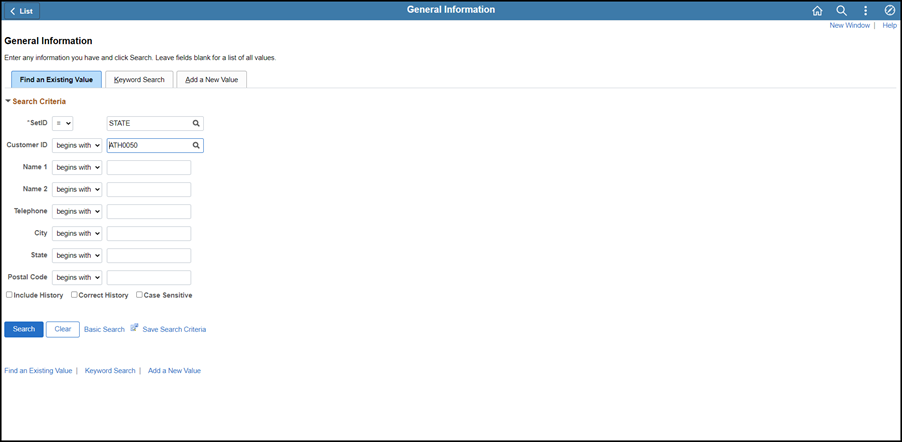
Steps for Searching for the Customer
- Enter the "owning" agency code in the Set ID field.
- Each agency has their own customer records, even if the company works with multiple agencies.
- Enter the Customer Name.
- Click Search to determine if the customer exists in OAKS FIN.
- If the customer exists, either the record or a list of matching records displays.
Steps for Creating the Customer
-
Click the Add a New Value tab.
-
Verify the agency code in the SetID field,
-
Enter a Customer ID number in the Customer ID field according to the agency's policy.
-
Click Add.
- Only those fields on the form that are marked with an asterisk are required to be completed.
-
Optional: Select an optional page and enter data as desired. These pages can only be accessed by selecting the page name on the General Info Links dropdown list. The two most common optional pages are:
-
0100 - Notes - The Notes page allows the agency to post internal notes about the customer. Click the Add a new row icon for each new entry.
-
0020 - Additional General Info - This page can be used to document the customer's Tax ID.
-
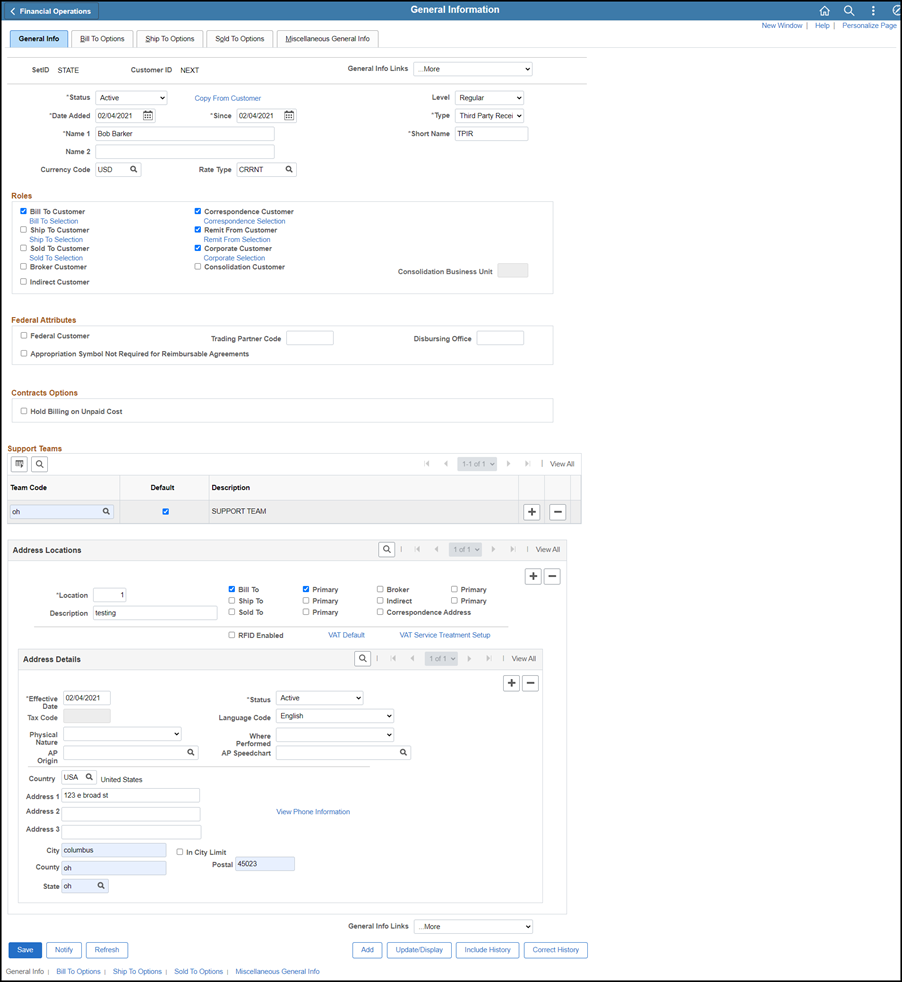
Confirm the Date Added (when the customer is being added to OAKS FIN). The system automatically sets the Date Added field to the current date.
-
Enter the date the state started doing business with the customer in the Since field.
-
Confirm that the Level is "Regular." (All OAKS FIN Customers are considered "Regular.")
-
Select the Type of customer from the dropdown list.
-
-
Third Party Receivable: Third party external customers.
-
Local Government AR: Local government customers.
-
Higher ED AR: Post-high school institutions receiving state money.
- Agencies of the state of Ohio that are customers of other state agencies are created by OBM/State Accounting.
-
Optional: Click the Copy From Customer link to copy information (General Inforamtion, Addresses, Bill To Options, Bill To Customers, and Support Teams) from an existing customer.
- These instructions assume the user does not choose to copy data from an existing customer. If the user does choose to copy data, follow these three steps.
-
-
Select the Customer ID of the customer to be copied.
-
Select the Data to Copy.
-
Click OK.
- Enter the legal name of the customer in the Name 1 field.
- Edit the Short Name field.
- The default is the first ten characters and spaces of the Name 1 field.
- Enter "USD" as the Currency Code.
- Enter "CRRNT" as the Rate Type.
- Select the applicable Role.
- For this example, the Bill To Customer checkbox is being selected.
- Correspondence Customer and Remit From Customer checkboxes are automatically selected when Bill To Customer is selected.
- Enter "STATE" as the Support Teams Team Code.
- Click the Default checkbox.
- Verify Location defaults to "1" for a new customer.
- Enter a Description to distinguish this address from other locations that may be added later.
- Click the Bill To checkbox if the address is the Bill To address.
- A Credit Analyst and Collector (Bill To Options tab) must be selected if Bill To is marked.
- Click the Primary checkbox if the address is the customer's primary address.
- Click the Correspondence Address checkbox if the address is the appropriate address for correspondence.
- Edit the Effective Date of the address, if entering it in advance of when it should be effective.
- Typically, the default displaying the current date is accepted.
- Enter the AP origin code in the AP Origin field if the customer is a state agency.
- An AP origin code is a unique three-character code that is tied to a specific location for a customer that is an agency of the state of Ohio.
- The buying agency will provide the AP Origin Code for that specific location.
- If the wrong AP origin code is used the voucher might not get routed to the right person for approval, which could delay payment.
- Verify the Status is "Active.
- Enter the street address in the Address 1 field.
- Enter the City
- Enter the zip code in the Postal field.
- Enter the two-character State code.
- Edit the Effective Date of the address, if entering it in advance of when it should be effective.
- Typically, the default displaying the current date is accepted.
- Click the Bill To Options tab.
- The Bill to Options page displays the agency customer collection assignments.
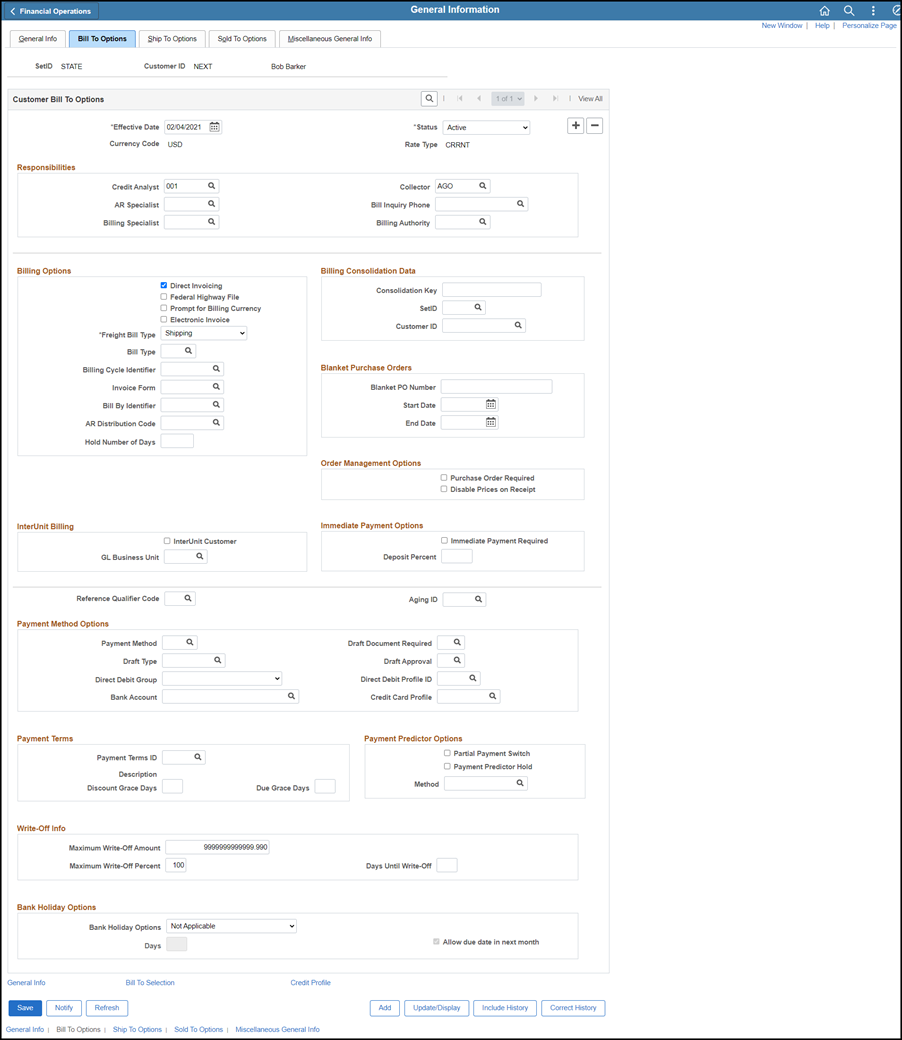
- Use the Look Up Credit Analyst tool to select "001" as the Credit Analyst.
- This is the generic analyst used by all state agencies.
- Use the Look Up Collector tool to choose a Collector name.
- Choose "Office of Budget and Management" for customers that are state agencies and "Attorney General's Office" for all others.
- Click Save.